Starting Lapidary Work: First Equipment and First Stone
Most lapidary content falls into two categories. Either it's a comprehensive equipment guide listing every tool a professional workshop might need, or it assumes you already understand the basic process and skips straight to advanced techniques. Neither helps much when you're trying to figure out what actually happens between "I want to try cutting stones" and holding a finished cabochon.
The gap between those two points is wider than it looks. Not because lapidary work is particularly difficult, but because the learning curve involves understanding what each piece of equipment does, why the process follows a specific sequence, and what "good enough" looks like at each stage.
Rock tumbling often serves as the entry point to lapidary work. Load rocks into a barrel, add grit, run the tumbler for weeks, get polished stones. It's satisfying and requires minimal equipment. But tumbling doesn't teach much about shaping or controlling the final form. Every stone comes out rounded and whatever size the process reduces it to.
Cabochon cutting is where most people encounter actual lapidary work. Taking a rough stone, deliberately shaping it to a specific form, and polishing it to a high gloss. The equipment needed is more extensive than tumbling but less than faceting. The skills learned transfer to other lapidary techniques.
The Minimum Equipment Reality
A basic cabochon setup requires four things: something to cut with, something to grind with, something to polish with, and constant water supply.
The cutting tool is typically a trim saw with a diamond blade. Slabs rough material into workable pieces. Removes damaged sections. Creates flat surfaces to work from. A 6-inch blade handles most beginner rough. An 8-inch or 10-inch blade cuts larger material but costs more to replace when worn.
The grinding tool shapes the stone. This can be a cabbing machine with multiple wheels at different grits, or a simple flat lap, or even a single grinding wheel. Commercial cabbing machines come with 4 to 8 wheels pre-mounted with progressive grits. Single-wheel setups cost less but require changing wheels between grit stages.
The polishing stage uses felt or leather wheels with polishing compounds. Different compounds work better with different stone types. Cerium oxide, aluminum oxide, tin oxide, and diamond compounds each have specific applications.
Water prevents heat buildup that can crack stones and keeps diamond tools from loading up with debris. Trim saws use flood cooling or drip systems. Grinding wheels run under constant water flow. Dry grinding generates enough heat to damage both the stone and the grinding surface.
The complete minimal setup runs around $400 to $800 for new equipment. A combination unit that handles both grinding and polishing costs less than buying separate machines. Used equipment cuts the entry cost significantly if you can find it locally and verify it works.
Some people start with even less. A bucket of water, sheets of wet/dry sandpaper in progressive grits from 60 to 2000, and a flat surface to work on. This is genuinely minimal, costs under $50, and works for small cabochons. It's also slow and physically demanding. The sandpaper method teaches the process but most people upgrade to powered equipment fairly quickly.
Modernhaus covers the complete lapidary craft — from rough stone to finished cab.
Explore the Stone Studio →What Makes a Stone Beginner-Friendly
Not all stones cut the same way. Some materials forgive mistakes. Others fracture unpredictably or refuse to polish properly despite following the correct process.
Jasper sits at the top of beginner recommendations. It's opaque, so internal flaws don't show through and ruin aesthetics. It's hard enough (7 on Mohs) to polish well but not so hard that it wears out grinding wheels quickly. It comes in enough color varieties to stay interesting. Most importantly, jasper is forgiving. Grind too much off one side and you can often save the piece by adjusting the design rather than starting over.
Agate shares similar characteristics but with translucency. Light passes through thin sections, which creates beautiful effects but also reveals any internal fractures or grinding marks that didn't fully polish out. Agate works well for beginners who are careful about grit progression but punishes shortcuts more than jasper does.
Obsidian cuts beautifully and polishes to an incredible mirror finish with minimal effort. It's also volcanic glass that chips if you look at it wrong. Good for learning how sharp edges behave during grinding. Less good for building confidence in your ability to complete a piece without fracturing it.
Softer stones like turquoise, malachite, or chrysocolla require different techniques than the standard quartz-family approach. They load up grinding wheels with residue. They need gentler pressure during shaping. They polish with different compounds. Better to learn the basic process with standard materials before adding the complexity of soft-stone technique.
Granite, limestone, and other common rocks rarely make good cabochon material despite being easy to find. Multiple minerals with different hardness levels means uneven grinding and poor polish. Sedimentary rocks often have internal layers that separate during cutting. Plenty of exceptions exist, but randomly found rocks have lower success rates than purpose-purchased lapidary rough.
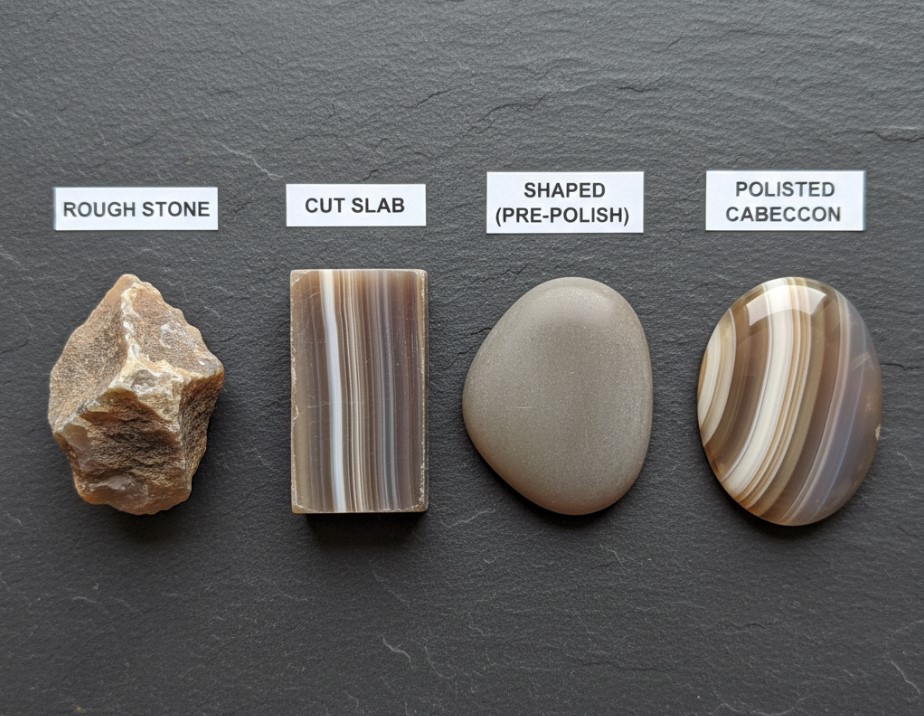
The Actual Sequence From Rough to Finished
The progression from raw material to completed cabochon follows specific stages. Each stage prepares the surface for the next. Skipping steps or rushing through them shows up clearly in the final result.
Slabbing reduces rough material to workable thickness. A trim saw cuts through rock more slowly than expected. A 2-inch thick piece might take several minutes to cut depending on material hardness and blade quality. The slab needs to be thick enough for the final cabochon dome height plus grinding allowance. Most cabs are 5-8mm thick at the center, so slabs are cut around 10-12mm to allow for material loss during shaping.
Layout involves looking at the slab and deciding where to cut cabochons from it. Interesting patterns, color variation, and avoiding obvious flaws all factor in. Beginners often discover they should have oriented the cab differently to capture a better pattern, but that lesson only comes from experience.
Rough shaping removes excess material using coarse grinding wheels. This is the fastest material removal stage. A 80-grit wheel takes off stone quickly. The goal is creating the basic cabochon shape - dome on top, flat or slightly beveled on bottom. Symmetry matters but perfection doesn't yet. Getting the proportions roughly correct matters more than fine details.
Refining the dome happens on finer grits. 220-grit smooths out the grooves left by 80-grit. 400-grit removes 220-grit marks. 600-grit takes out 400-grit scratches. Each stage removes the marks left by the previous stage. The dome shape gets refined during this process. Checking the profile from multiple angles reveals flat spots or asymmetry that need correction.
Pre-polish at 1200 or 1500 grit creates the foundation for final polish. The stone surface should look uniform under close examination. Any remaining scratches will show through polish. This stage takes longer than expected because it's easy to convince yourself the surface is smooth enough when it isn't quite there yet.
Polishing uses soft wheels (felt, leather, or similar) with polishing compounds specific to the stone type. Cerium oxide works well on quartz family stones. The compound needs light pressure and steady movement across the wheel face. Too much pressure generates heat. Too little pressure doesn't polish effectively. The stone should be dry before polishing, as water dilutes the compound.
The entire process for a single cabochon takes 30 minutes to several hours depending on size, material, and skill level. First attempts usually take longer than experienced cutters expect. The learning happens in discovering how much pressure to use, how to maintain symmetry while removing material, and what "ready for the next stage" actually looks like.
What the First Attempt Usually Looks Like
Beginner cabochons have predictable characteristics. Slightly asymmetric domes. Flat spots where grinding pressure wasn't evenly distributed. Visible scratch patterns that didn't fully polish out. Thickness variations around the edge.
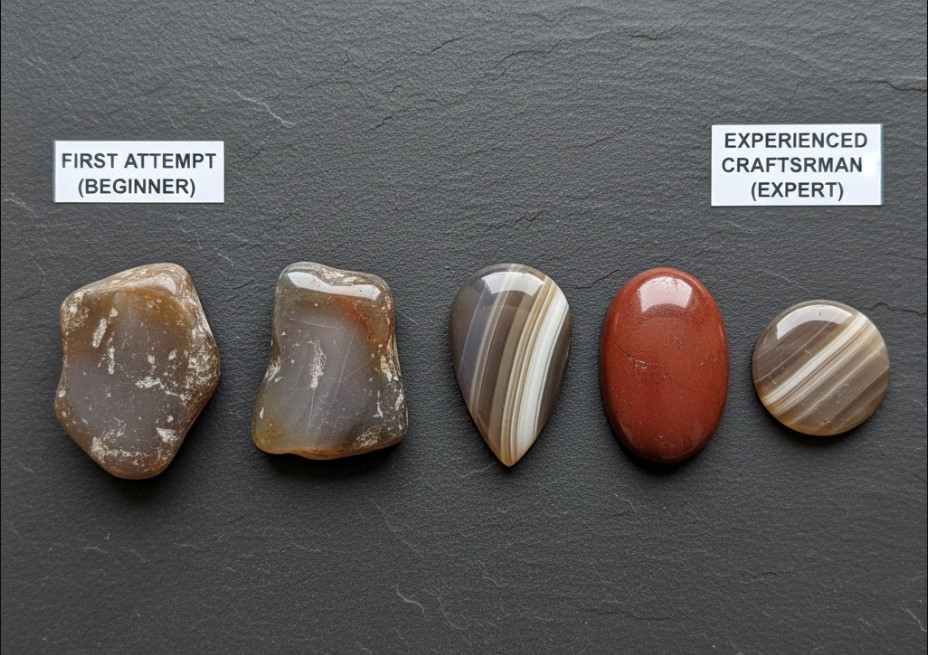 The gap between first attempts and consistent results - beginner work (left) versus experienced cutting (right)
None of these flaws make the piece a failure. They're documentation of the learning process. The first cab that actually polishes to a decent finish feels like an accomplishment regardless of minor imperfections.
Common specific issues include:
 Typical beginner issues: uneven edges, asymmetric domes, and incomplete polish
Grinding too thin at the edges. The dome should have substance near the perimeter, not feather to nothing. Thin edges chip easily and make the cab hard to set if you're doing jewelry work. This happens because material removes faster at edges than at the center due to greater contact area against the grinding wheel.
Uneven dome height. One side of the cab is noticeably taller than the other. This comes from not rotating the stone evenly during grinding or from applying more pressure to one side. Checking the profile from multiple angles during grinding reveals this before too much material gets removed to correct it.
Polish that looks good until the light hits it wrong. Then visible scratches appear that weren't obvious during polishing. This means the pre-polish stage wasn't completed properly. Some scratches remained when starting the polish stage, and polish can't remove scratches, only make the surface between scratches shinier.
Loading up the polish wheel with stone residue. The polish compound should stay clean and effective. If it's getting contaminated with ground stone material, either the stone wasn't clean before polishing or residual grit from earlier stages is still present. This is particularly common when working with softer materials that shed dust more readily.
Chipping while trying to maintain sharp edges. This is normal with brittle materials. The solution is rounding edges slightly during final grinding rather than trying to maintain perfect sharp corners through to polish. Obsidian and similar materials need gentler edge treatment than agate or jasper.
The gap between first attempt and consistent results is maybe 10 to 20 cabochons worth of practice. Not because the skill is particularly complex but because understanding how much pressure creates what result requires feeling it repeatedly. Written descriptions only get you so far.
Cost Reality Check
The $400 to $800 entry equipment cost is just the start. The trim saw blade wears out. Grinding wheels need replacement. Polishing compounds run out. Water makes a mess that needs managing. The workshop space requires adequate ventilation and drainage.
Rough material costs vary wildly. Jasper can run $2 to $5 per pound for common varieties. Premium agate might hit $10 to $30 per pound depending on pattern quality. Small pieces of specialty material like quality turquoise or fire agate can cost more per stone than your entire equipment setup.
The economic reality: hobby lapidary work rarely pays for itself through sales unless you specifically build a business around it. The finished cab that took three hours to complete sells for maybe $20 to $50 depending on material and quality. Your time valued at minimum wage exceeds the sale price before accounting for equipment depreciation and materials cost.
People do lapidary work because they find the process satisfying, not because it's economically rational. The finished piece has personal value beyond market price. The skill development is the goal rather than the means to profit.
Some cost savings exist through careful shopping. Estate sales and retiring lapidaries sometimes sell complete workshops well below market value. Rock and mineral clubs often have equipment available for member use, eliminating personal purchase requirements. Swapping rough material with other collectors reduces cash outlay compared to buying everything retail.
But the minimum investment to produce quality cabochons at home remains substantial compared to many other hobbies. This isn't a $50-and-you're-started situation like watercolor painting or bread baking.
Why Cabochons Before Faceting
Faceting is lapidary work's advanced form. Creating geometric faces at precise angles to maximize light return from transparent stones. It requires more expensive equipment, more precise technique, and transparent material that shows faceting to advantage.
Cabochon cutting teaches fundamental concepts that transfer to faceting. How to maintain symmetry while removing material. What progressive grit stages actually accomplish. How to recognize when a surface is ready for the next step. The mechanics of holding a stone against a moving grinding surface safely and effectively.
These skills matter for faceting but cabochon work provides more forgiveness during the learning process. A slightly asymmetric cab still looks decent. A faceted stone with slightly wrong angles looks obviously wrong. The precision requirements are different.
The equipment investment differs significantly too. A basic faceting machine runs $400 to $1500 for new units. Used machines from reliable manufacturers hold value better than cabochon equipment but appear less frequently on the secondary market. The learning curve for faceting is steeper, the material cost is higher (you're cutting transparent gems rather than opaque stone), and the time per finished piece increases substantially.
Most people who stick with lapidary work eventually try faceting. But starting with cabochons provides a gentler entry point with faster gratification from completed pieces.
The Workshop Setup Question
A complete lapidary workshop requires water management, ventilation, drainage, and enough space to work comfortably. This is not kitchen-table work. Water spray is constant during grinding. Stone dust gets everywhere despite water control. The equipment is heavy and needs stable mounting.
Garage or basement workshops are common. Outdoor covered spaces work in mild climates. Dedicated shop buildings are ideal but not required. The key requirements are concrete or tile flooring that tolerates water, adequate drainage for runoff, and ventilation to handle any airborne dust that escapes the water spray.
Stone identification becomes relevant once you start working with found material or unlabeled rough. Bought rough usually comes identified, but field-collected stones require hardness testing and visual examination to determine if they're worth the effort of cutting.
The workshop grows incrementally for most people. Start with minimal equipment. Add capabilities as specific needs arise. A rock tumbler might come first for kids or casual interest. Then a trim saw when you want to process your own rough. Then grinding and polishing equipment when tumbled stones aren't enough anymore. Eventually maybe a faceting setup or specialty equipment for specific stone types.
The progression isn't linear or required. Some people stay happy with tumbling. Others jump straight to faceting and skip cabochon work entirely. The point is there's no single "correct" path through lapidary equipment acquisition.
What Success Actually Means
A successful first cab is one that makes it through the entire process without fracturing and achieves some level of polish. It doesn't need to be perfect. It doesn't need to look professional. It needs to demonstrate that you understand the basic process and can execute it from start to finish.
The second cab will be better. The tenth cab will be significantly better. The fiftieth cab will look obviously more skilled than the tenth. This is normal progression.
Some people get frustrated during early attempts and quit. The stone cracks. The polish never quite gets there. The symmetry is obviously off. These aren't signs of incompatibility with lapidary work, they're signs that you're learning a physical skill that requires practice.
The satisfaction comes from holding something you deliberately shaped from raw material into finished form. That stone was a random chunk of rock. Now it's a polished cabochon with deliberate form and finish quality you created through understanding the process and executing the steps.
That's the actual value in beginner lapidary work, not the market price of the finished piece or even its absolute quality level. The process itself teaches observation, patience, and the relationship between technique and result in ways that extend beyond stone cutting.