Learning to Throw Pottery: What Actually Happens in Your First Sessions
Production potters throw 40-60 mugs per day once they've developed the muscle memory and speed. During your first week of wheel throwing, you'll successfully complete exactly zero mugs. Maybe zero bowls too. Possibly zero anything that resembles a functional vessel. This gap between total beginner and competent thrower spans roughly 30-50 hours of practice spread over months, assuming weekly sessions. The timeline compresses with daily practice or extends with sporadic attempts.
The difficulty isn't mystical or about artistic talent. It's pure physics and muscle coordination. Your hands need to apply precise, consistent pressure to spinning clay while that clay tries to tear itself apart from centrifugal force. Too much pressure and the clay collapses. Too little and it wobbles off-center. The pressure needs to come from your whole body braced against the wheel, not just arm strength. Your hands stay steady while the wheel spins at 80-120 RPM. This coordination pattern exists nowhere else in normal human movement.
The potter's wheel operates on principles unchanged since its invention around 4000 BCE in Mesopotamia. A rotating horizontal disk (the wheel head) spins clay at speeds controlled by the potter. Centrifugal force wants to throw the clay outward. Gravity pulls it down. The potter's hands provide inward and upward pressure that balances these forces, creating hollow cylindrical forms. When all three forces align, clay rises into walls. When they don't, clay turns into wobbly disasters.
Wheel throwing produces symmetrical forms that hand building can't efficiently replicate. Bowls, cylinders, plates, cups - anything requiring circular symmetry works better on the wheel once you've developed the skill. The method trades accessibility for precision. Hand building lets beginners make successful pieces in their first session. Wheel throwing demands weeks of practice before anything works. But that precision enables production speeds impossible with hand methods.
What Centering Actually Requires
Centering clay means forming a perfectly symmetrical mass on the spinning wheel head with no wobble. The clay needs to spin without any part moving higher, lower, or wider than any other part. Perfectly centered clay looks like a solid cone or dome rotating in place. Off-center clay wobbles visibly, one side bulging outward each rotation. Every wheel-thrown form starts from centered clay. Skip this step and everything that follows fails.
The movement involves constant inward and downward pressure against spinning clay. Your left hand braces the clay from the side. Your right hand presses down from the top. Both hands lock together into a single stable unit. The clay bulges up under your hands, then you push it back down. Up and down, up and down, each cycle nudging the mass closer to center. The wobble decreases gradually until it disappears.
Body position matters more than hand strength. Potters brace their arms against their torso or the wheel's splash pan, creating a solid connection from shoulders through arms to hands. This positioning lets you apply steady pressure without arm fatigue. The pressure comes from leaning your body weight into the clay rather than muscular force. Arms that aren't braced shake from effort within 2-3 minutes, making centering impossible.
The sound changes as clay approaches center. Off-center clay makes an irregular slapping sound against your hands - thwap... thwap... thwap - each rotation slightly different. Centered clay produces a smooth continuous hum. Experienced potters center with eyes closed, listening for that sound shift. Beginners watch the clay obsessively, trying to see what their hands can't yet feel.
Wheel speed affects centering difficulty. Too slow (under 60 RPM) and the clay doesn't have enough momentum to stay stable. Too fast (over 150 RPM) and centrifugal force fights your hands aggressively. Most potters center at 100-120 RPM, fast enough for momentum but slow enough to control. Electric wheels show RPM on a display. Kick wheels require developing a feel for optimal speed.
Clay stiffness dramatically impacts centering success. Soft clay centers easily but collapses during wall pulling. Stiff clay fights centering but holds shape better later. Beginners often work with clay that's too soft because it feels easier initially, then wonder why their bowls slump. The ideal consistency feels like firm cheese - pliable under strong pressure but not mushy. Too dry and it tears. Too wet and it's soup.
First attempts at centering typically fail for 20-45 minutes straight. The clay wobbles, you apply pressure, it wobbles differently. You push harder, it deforms into a lopsided lump. You try to fix the lump, it tears partially off the wheel head. This loop repeats for an hour or more in early sessions. Most beginners leave their first class having successfully centered clay exactly once, maybe twice, for about 15 seconds each time before losing it.
The breakthrough happens suddenly rather than gradually. Session four or five, your hands lock into position correctly, your body weight shifts at the right angle, and the clay centers smoothly within 45 seconds. You pull up a wall successfully for the first time. The form stays centered all the way up. That moment - when muscle memory finally connects and the clay obeys - feels wildly disproportionate to the frustration that preceded it. Many potters can identify the exact throwing session where everything clicked.
Modernhaus documents studio pottery from wheel to kiln.
Explore the Clay Studio →Pulling Walls: Creating Hollow Forms
Wall pulling transforms a centered solid mass into a hollow cylinder. The process requires opening a hole in the centered clay, then pulling the walls upward while thinning them to useable thickness. The mechanics involve coordinated inside and outside hand pressure while the wheel spins. One hand inside the pot pushes outward. The other hand outside resists that pressure. The clay caught between your hands gets squeezed thinner and pulled taller.
Opening the centered mass starts by pushing your fingers or thumb down into the clay's center while the wheel spins. The pressure creates a well, like pushing your thumb into a stick of butter. You stop about 1/4 to 1/2 inch from the bottom - punch through to the wheel head and the piece becomes a donut rather than a pot. This bottom thickness varies by final form. Bowls need thicker bottoms than cylinders. Plates want thin, even floors.
The first pull establishes wall height and angle. Fingers inside push outward and slightly upward. Outside hand provides resistant pressure. The clay between thins and rises. Pull too fast and the clay tears. Too slow and it dries out before you finish. The ideal pull takes 10-15 seconds from bottom to rim, moving steadily upward without stopping. Stopping mid-pull creates a weak ring where the clay remembers the hesitation.
Subsequent pulls continue thinning and raising the walls. Most functional pottery requires 3-5 pulls to reach final wall thickness of 3-6mm. Each pull thins the walls further and adds height. The cylinder grows taller and thinner with each pass. Between pulls, many potters compress the rim - squeezing it gently to prevent cracking from the repeated stretching. Uncompressed rims split and tear during throwing or drying.
Wheel speed decreases as walls rise. Centering happens at 100-120 RPM. Opening and first pulls work at 80-100 RPM. Final shaping and thinning happen at 60-80 RPM. Slower speeds give more control for delicate work but less momentum to keep the form stable. Finding the right speed for each step develops through practice and varies between potters.
Water keeps clay workable during throwing. Wet hands slide across spinning clay. Dry hands grab and tear it. But too much water weakens the clay structure catastrophically. The clay absorbs water during throwing, becoming progressively softer. After 5-7 minutes of wet throwing, clay that started at perfect consistency turns to mush that can't hold walls. Experienced potters use minimal water, just enough for lubrication. Beginners flood the clay, then wonder why their pots collapse.
Common beginner mistakes create recognizable failure patterns. Thick bottoms with thin walls make top-heavy pots that crack during drying. Uneven walls - thick on one side, thin on the other - result from off-center clay or uneven pressure during pulling. Accordion-pleated walls come from pulling too slowly or applying inconsistent pressure. S-curve profiles indicate pulling at wrong wheel speeds. Each mistake teaches specific lessons about pressure, speed, and timing.
The physical sensation of successful throwing feels distinctive. Centered clay has a calm, stable quality under your hands. Walls rising properly create smooth resistance without fighting. When everything works, you're guiding clay rather than forcing it. The wheel noise stays consistent. Your hands stay relaxed. The form grows predictably taller and thinner. This feeling - when all variables align - becomes addictive for many potters. It's why they return despite the frustration.
Form Control and Symmetry
Shaping thrown forms beyond basic cylinders requires controlling wall angle and curvature while maintaining symmetry. Bowls curve outward. Vases curve inward then outward. Bottles have narrow necks and wide bodies. Each shape demands specific hand positions and pressure patterns applied while the wheel spins. The clay wants to stay cylindrical - any other shape requires deliberate manipulation.
Belly curves on vases and bottles develop through interior pressure without exterior support. One hand inside pushes outward against the spinning wall. The outside hand pulls away, letting the belly expand. Too much interior pressure and the form bulges asymmetrically. Too little and the curve stays timid. The clay remembers every pressure variation, showing any hesitation or unevenness as visible ripples in the finished curve.
Inward curves require reverse pressure patterns. Both hands squeeze the spinning clay from outside, narrowing the form's diameter. This technique creates bottle necks, closed vase forms, and narrow-mouthed vessels. The clay wants to collapse inward completely - your hands prevent total closure while encouraging the desired curve. Collaring (narrowing the neck) works in small increments. Rush it and the clay folds over itself rather than curving smoothly.
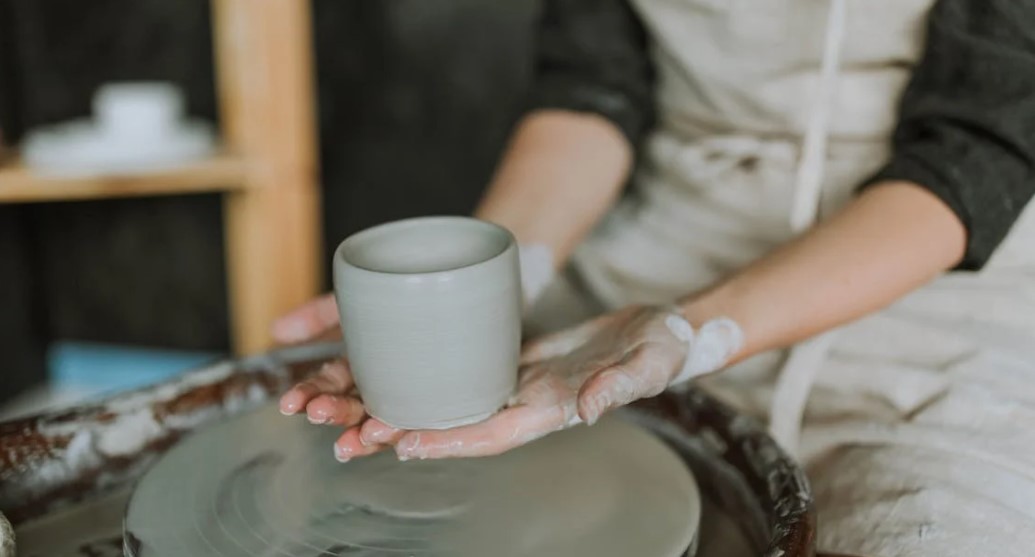
Rim finishing determines both function and aesthetics. Coffee mugs need slightly flared rims that feel comfortable against lips. Bowls want compressed rims that resist chipping. Vases often feature rolled or thickened rims for visual weight. Each rim style requires specific tools and techniques. A simple compression between wet fingers works for basic bowls. Shaped ribs create more complex profiles. Poor rim finishing ruins otherwise successful pots - lips that feel sharp, uneven, or awkward to drink from.
Trimming happens after throwing when clay reaches leather-hard consistency. The pot goes back on the wheel upside-down, attached with clay coils or a chuck. A trimming tool cuts away excess clay from the base, defining the foot ring and final bottom profile. Trimming serves both functional and aesthetic purposes - removing weight, creating stable foot rings, revealing clean lines. Many thrown forms look heavy and crude until trimming reveals their intended proportions.
Measuring tools barely exist in traditional throwing. Potters develop visual and tactile calibration for wall thickness, height, and diameter. Calipers measure rim diameter when making lidded forms that need precision fits. Otherwise, experienced throwers gauge everything by eye and touch. This skill develops slowly - beginners make 3-inch cylinders thinking they're 5 inches, or pull walls to 2mm thinking they're 5mm. Accuracy improves through hundreds of pots.
Production throwing requires near-perfect consistency. Making 40 matching mugs means each body weighs identically, reaches identical height, and has identical wall thickness. Production potters weigh clay balls to 0.1-pound accuracy, throw each form to within 1/4 inch of target height, and maintain wall thickness within 1mm across all pieces. This precision develops after throwing thousands of pots and becomes muscle memory rather than conscious measurement.
The speed increase from beginner to production potter is dramatic. First successful bowl might take 45 minutes from centering to final shaping. After 100 practice pieces, basic bowls happen in 8-10 minutes. Production potters throw simple bowls in 2-3 minutes, cylinders in 90 seconds. The time compression comes from eliminating hesitation - every movement becomes automatic, hands know exactly where to go and how much pressure to apply.
What Your Body Actually Learns
Wheel throwing develops specific physical skills that transfer poorly to other activities. The muscle memory patterns, pressure calibration, and hand-eye coordination are unique to pottery. This explains why instruction helps more than watching videos - your body needs to feel the correct movements, not just see them. The learning happens in your hands, arms, and postural muscles through repetition under varied conditions.
Pressure calibration stands as the primary skill. You learn to feel the difference between 2 pounds of pressure and 3 pounds while both hands apply force to spinning clay. This sensitivity develops over dozens of hours. Initially, you either barely touch the clay or crush it. The middle ground where clay responds without collapsing takes persistent practice to locate and maintain consistently.
Bilateral coordination means both hands do completely different jobs simultaneously. Left hand braces and supports. Right hand applies dynamic pressure. They work together but with opposite functions. This differs from most manual tasks where hands either mirror each other or one assists the other. Throwing requires true independence - each hand has its own job and they coordinate through timing rather than symmetry.
Postural stability provides the foundation for hand control. Wheel throwing works only when arms brace against something solid - torso, wheel splash pan, even the table edge. Floating hands shake from effort within seconds. The body learns to create a stable kinetic chain from feet through legs, torso, arms, to hands. This full-body engagement surprises beginners who expect throwing to be a hand activity.
The time sense develops as you learn how long each action takes. Centering requires 30-90 seconds depending on clay amount and stiffness. Opening takes 15-20 seconds. Each wall pull runs 10-15 seconds. Knowing these durations helps prevent rushing (which causes tears) or dwelling too long (which over-wets the clay). Experienced potters feel when timing is wrong even before visible problems appear.
Tactile feedback through wet hands becomes incredibly refined. You feel wall thickness without measuring, sense when clay approaches collapse before it happens, detect tiny wobbles through your fingertips. This sensitivity develops because wheel throwing requires it - visual feedback alone isn't enough when your hands block your view and everything spins continuously. Trust in tactile sensation over visual appearance takes months to develop.
The mental state during successful throwing resembles meditation more than focused concentration. Overthinking disrupts the flow - the conscious mind can't coordinate all the variables fast enough. The body needs to work from developed patterns without verbal instruction from the brain. Many potters report losing time awareness during productive throwing sessions, realizing hours passed while it felt like 30 minutes.
Physical fatigue appears in unexpected places. Beginners expect arm fatigue but get hit with lower back pain from hunching over the wheel. Neck and shoulder tension from holding rigid posture. Hand cramps from gripping tools too tightly. Even foot soreness if standing at the wheel. The whole body participates in throwing, and the repetitive motions combined with sustained tension create fatigue patterns unique to pottery.
The Timeline Reality
Week one typically produces zero completed forms but establishes whether you enjoy the process enough to continue. Most first-time throwers spend the entire session just trying to center clay. Maybe one or two brief successes where the clay stays centered for 15-30 seconds before wobbling off again. That's normal and expected. The session teaches your hands what centered clay feels like and shows you how far you are from consistent success.
Weeks two through four focus on centering consistency. By the end of week four, most students can center 2-3 pound clay balls within 90-120 seconds. Not every attempt succeeds but the success rate climbs from 10% to 60-70%. These weeks build the foundational skill everything else requires. No amount of wall-pulling instruction helps until you can center reliably.
Weeks five through eight introduce opening and pulling walls. The frustration resurges - just when centering felt manageable, adding new steps breaks everything. Common problems include punching through the bottom while opening, tearing walls during first pulls, and collapsing forms from too much water. By week eight, basic cylinders 4-5 inches tall with relatively even walls become achievable. Maybe one keeper piece per hour-long session.
Months three through six expand the form vocabulary. Bowls, wider cylinders, basic curves. Each new shape requires modified hand positions and pressure patterns. The success rate stays around 50-60% - half your attempts still fail, but now you can usually identify why. Wall thickness becomes more consistent. Rims stop cracking as frequently. The pots start looking intentional rather than accidental.
Months six through twelve mark the transition from advanced beginner to competent amateur. You can reliably throw basic functional forms - bowls, cups, simple vases. Wall thickness stays under 5mm. Throwing 6-8 completed pieces in a 2-hour session becomes normal. Forms require trimming but the thrown shape is close to final. Projects that would've taken an hour in month two now finish in 15-20 minutes.
Years two and three develop refinement and speed. Production throwing techniques start working - throwing multiple identical pieces, working faster without sacrificing quality, understanding clay behavior across different conditions. Making dinner sets of 8 matching plates and bowls becomes feasible rather than fantasy. The pots look professional even if your skill level remains amateur.
The plateau around year three frustrates many potters. You're competent but not exceptional. Forms work but lack the effortless elegance of master potters. Progress slows from obvious jumps to subtle refinements. This plateau breaks through continued practice and possibly advanced instruction, but the quick gains of the first year don't return. Improvement from year three to year five is smaller than month one to month six, even though year five potters are dramatically better.
Professional production speed develops only through daily throwing practice over multiple years. The 40-60 pieces per day benchmark requires 3-5 years of consistent practice for most potters. Some reach it faster with intensive practice. Others never get there despite years of casual throwing. The difference between hobbyist and production potter isn't talent - it's accumulated muscle memory from throwing thousands of pots.
Why People Persist Despite the Learning Curve
The immediate feedback loop keeps potters engaged despite frequent failure. Every throwing session provides clear results. Either the pot works or it doesn't. The clay doesn't lie about your skill level. This brutal honesty appeals to people tired of subjective creative pursuits where "good" depends on opinion. A centered pot is centered. A collapsed pot is collapsed. No ambiguity.
The physical engagement satisfies in ways purely mental or visual activities don't. Your hands shape something real. The clay's resistance provides tangible feedback. The wheel's momentum has weight and presence. After hours at a computer or in meetings, working with an actual material that pushes back feels fundamentally different. The satisfaction comes partly from making something and partly from the physicality itself.
The progression milestones are addictive once you start hitting them. First centered clay. First pulled wall. First complete bowl. First set of matching cups. Each milestone feels like a genuine achievement because the difficulty was real. Unlike video games with manufactured challenges, pottery's difficulty comes from actual physics and material properties. Overcoming that registers differently in the brain.
The community aspect of pottery studios creates social connection around shared struggle. Everyone in the studio understands throwing frustration intimately. Experienced potters remember their own collapsed bowls. Beginners commiserate over similar disasters. The shared experience builds camaraderie that isolated hobbies lack. Plus watching skilled throwers work provides direct inspiration and learning.
The functional output matters to many potters. Unlike painting or sculpture where the object's only purpose is to be looked at, pottery creates useable things. Mugs that hold coffee. Bowls that serve salad. Plates that go in the dishwasher. The dual nature - both art object and functional tool - satisfies a different creative urge than purely decorative work.
The meditative quality of throwing attracts people seeking active meditation alternatives. Sitting meditation frustrates many people. Moving meditation through pottery works better for those who need physical engagement. The wheel's rotation, the repetitive hand movements, the necessary present-moment focus all create meditative states without requiring stillness.
The unlimited skill ceiling means you never finish learning. Even potters throwing for 40 years discover new techniques or refine existing ones. The basics - centering, pulling, shaping - contain enough subtlety to explore indefinitely. This open-ended progression appeals to people who get bored once they've "mastered" something.
What Success Actually Looks Like at Different Stages
Three-month throwers make functional but crude pots. Thick walls, uneven rims, heavy bottoms. The bowls hold soup successfully but don't look refined. Throwing marks show clearly. Proportions feel off even if you can't articulate why. These pots work but announce their maker's beginner status. Most potters keep very few pieces from this stage, though some early successes carry sentimental value.
One-year throwers produce recognizably competent work. Wall thickness under 5mm, relatively even rims, proportions that look intentional. The pieces work both functionally and aesthetically. Someone using these bowls or mugs wouldn't necessarily know the maker was a hobbyist rather than professional. Throwing marks might still be visible but they're even and consistent rather than chaotic.
Three-year throwers make refined pieces that could sell at craft fairs. Consistent proportions, deliberate design choices, clean execution. The difference between their work and professional production pottery is volume and consistency rather than individual piece quality. A three-year hobbyist might make 8 good mugs and 2 excellent ones. A professional makes 40 good mugs and 35 excellent ones.
The gap between advanced amateur and professional shows most clearly in consistency and speed rather than peak quality. Both can throw an excellent bowl. The professional throws 30 excellent bowls in the time the amateur makes 5. The professional's worst piece from a batch of 50 meets the amateur's best piece quality. This consistency comes only from daily throwing practice sustained over years.
Master potters - people throwing for 20+ years - make pieces where technical execution becomes invisible. You see only the form, not the making process. The clay looks effortless and inevitable, as if it could only be that exact shape. This quality emerges from such deep technical mastery that every movement is perfectly calibrated. The difference between competent and masterful is subtle but unmistakable once you learn to see it.
Starting Your Throwing Journey
Wheel throwing requires accepting that early sessions will be frustrating and produce zero successful pieces. This isn't a maybe - it's guaranteed. The question is whether you'll push through that frustration or quit. Knowing this beforehand helps. Expect to feel incompetent for weeks. Expect clay to not cooperate. Expect to wonder why anyone does this voluntarily. Then keep showing up anyway.
The initial time investment spans 30-50 hours before competency emerges. Weekly 2-hour sessions mean 4-6 months of consistent practice. Daily hour-long sessions compress this to 6-8 weeks. Sporadic practice extends it indefinitely - throwing once monthly produces almost no skill progression. The muscle memory requires repetition within short time frames to develop. Space sessions more than two weeks apart and you essentially restart each time.
Instruction accelerates learning dramatically compared to self-teaching from videos. A teacher sees your body position and hand placement errors you can't self-diagnose. They intervene before you develop bad habits. They explain what specific sensations to feel for. YouTube videos show what throwing looks like but can't tell you your left hand needs to move 2 inches closer to your body. Eight weeks of weekly classes produces more progress than six months of unsupervised practice.
The financial commitment for learning varies significantly by approach. Community studio memberships with included instruction run $50-150 monthly. Home wheels cost $300-2,000 depending on quality, but require space and cleanup infrastructure. Clay costs $15-25 per 25-pound bag, making 20-30 practice pieces. Firing access adds another variable - community studios include it, home potters need kiln access somehow. Budget $100-200 monthly for serious learning through classes, or $500-1,000 initial investment for home setup.
The question isn't whether you can learn wheel throwing - most people with hand function can, given enough practice. The question is whether you'll enjoy the learning process enough to sustain practice through the frustration phase. Some people love it immediately despite constant failure, energized by incremental progress. Others find the repetitive failure demoralizing and quit. Neither response is wrong - they're just different temperaments meeting a specific type of challenge.
Starting with community studio classes provides the lowest-risk entry point. Sign up for an 8-week beginner course. Give it the full session before deciding whether to continue. You'll know by week six or seven whether throwing clicks for you or not. If it does, you'll be planning your next classes before the session ends. If it doesn't, you're out $150-250 and some evening time rather than having purchased a wheel you'll never use.