Painted Air Dry Clay Ornaments: Materials and What Actually Happens
Painted clay ornaments sell for $12-25 at craft fairs, which seems reasonable until you realize the materials cost about $0.50-1.00 per piece once you have supplies. A package of air dry clay runs $8-12 and makes 15-20 ornaments depending on size. The paints, brushes, and rolling tools add another $20-30 for a complete starting setup.
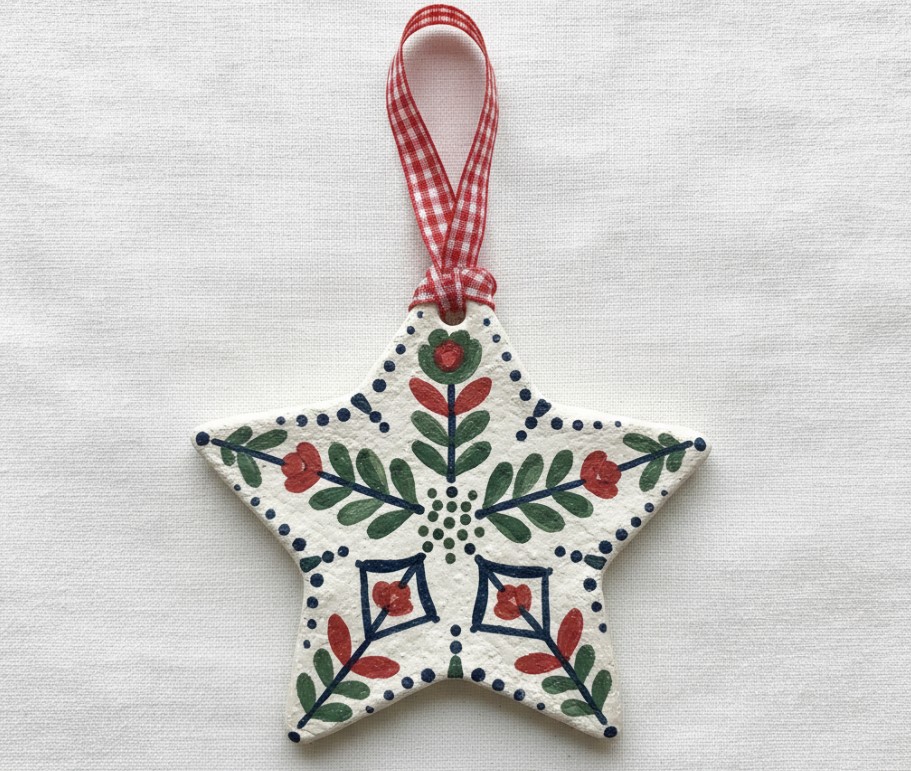
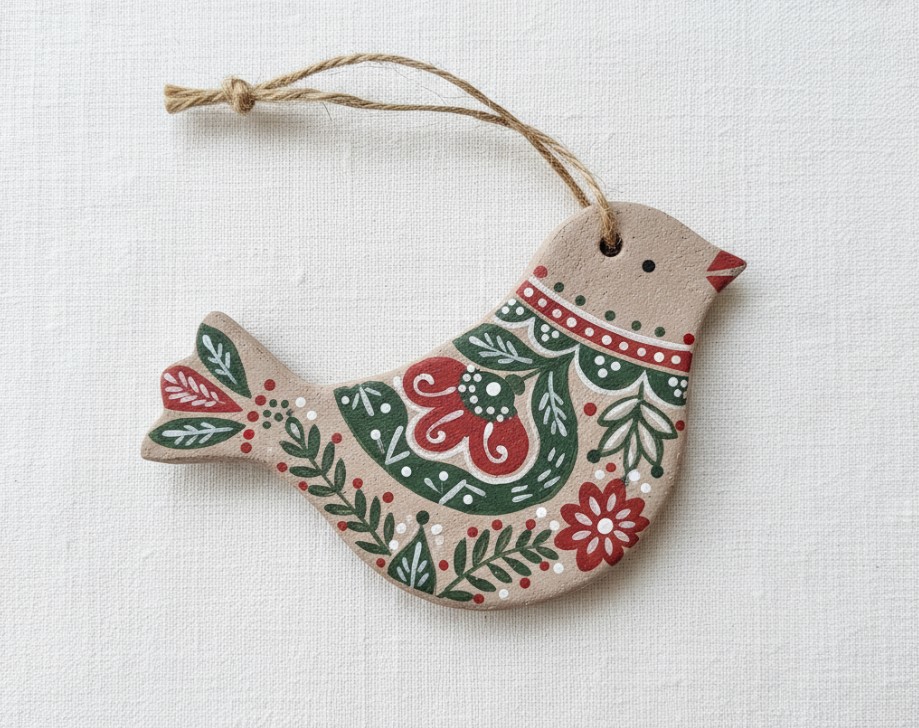
The aesthetic comes directly from folk art traditions that were huge in mid-century American homes. Scandinavian Christmas ornaments, Mexican tin work with their distinctive painted patterns, Polish paper cuts translated to clay. These decorative techniques appeared everywhere during the 1950s-60s as part of the era's obsession with global craft. Alexander Girard collected folk art extensively and used those motifs in his Herman Miller textiles. George Nelson incorporated similar patterns into his designs. The whole handmade ornament category exploded during this period, and that painted folk aesthetic became synonymous with thoughtful, artistic home decoration.
The material itself matters here. Air dry clay works perfectly for flat decorative pieces because it's lightweight, takes paint well, and doesn't require the structural strength of fired ceramics. You're making ornaments, not functional pottery. The clay composition - typically a polymer-based mixture developed in the 1990s - dries through evaporation rather than chemical transformation. This means no kiln, no specialized equipment, just time and air.
What You Need From the Craft Store
Air dry clay comes in several formulations. DAS and Crayola Model Magic dominate craft store shelves in the US. DAS costs about $8-10 for a 1.1-pound package and dries to a matte, slightly porous finish that resembles unglazed ceramic. Model Magic runs $6-8 for similar quantity but dries lighter and slightly spongier. For painted ornaments where you want that folk pottery look, DAS gives better results. The surface texture holds paint without that foam-like quality some softer clays develop.
Cookie cutters define your shapes. Simple geometric forms - circles, stars, hearts, birds - work best for folk art patterns. Crafters typically use 2-3 inch cutters for tree ornaments, though smaller 1-inch versions make gift tags. Metal cutters cost $8-15 for a set of 6-8 shapes. The cutting edge needs to be sharp enough to punch through 2-3mm clay cleanly without dragging.
Rolling tools keep thickness consistent. A standard wooden rolling pin works fine, though many crafters prefer a small acrylic roller ($6-8) because you can see the clay thickness through it. Two wooden dowels or thick pencils taped to your work surface as guides ensure even rolling - position them on either side of the clay, rest the rolling pin on both, and you get uniform 2-3mm thickness automatically.
Paint choices split into three categories, each producing different effects. Acrylics seal the clay surface and create that glossy folk pottery look - brands like Apple Barrel and Folk Art run $1-2 per 2-ounce bottle. You'll want red, green, black, white, maybe terra cotta or ochre for authentic folk art palettes. Acrylics dry waterproof once cured, which matters for ornaments that might encounter humidity.
Gouache paints give that flat, matte folk art aesthetic straight from Scandinavian and Eastern European traditions. The colors dry to the exact tone you see when wet, none of that darkening that happens with acrylics. A basic gouache set costs $15-20 for 6-8 colors. The downside - gouache reactivates with water even after drying, so these ornaments need a protective spray sealer ($8-10 for clear acrylic spray).
Watercolors work but require more technique. The clay's porosity means colors soak in unevenly, creating that organic, handmade look that some people love and others find frustrating. A basic watercolor set costs $8-12. Like gouache, watercolored ornaments need sealing.
Brushes matter more than you'd expect. Round brushes in sizes 0, 2, and 4 handle detail work - the dots, lines, and small pattern elements that define folk art styles. Flat brushes in 1/4-inch and 1/2-inch widths fill background areas and create those distinctive stripe patterns. A basic set of synthetic brushes runs $6-10. Natural hair brushes perform better but cost $15-25 for similar variety.
String or twine for hanging adds the final element. Jute twine ($4-5 for 100 feet) gives that rustic folk art aesthetic. Thin ribbon works for more refined ornaments. Baker's twine ($6-8) splits the difference. You'll need something thin enough to thread through a 2-3mm hole but strong enough to support a 15-20 gram ornament.
Total startup cost assuming you're buying everything: $60-80. That makes roughly 15-20 ornaments in your first batch, dropping to $0.50-1.00 per ornament once you have supplies.
The Clay Working Process
Air dry clay arrives hard in the package. The material needs conditioning - kneading it like bread dough for 2-3 minutes until it becomes pliable. Too little kneading and the clay cracks when you roll it. Too much and it starts drying out from the warmth of your hands. The sweet spot feels like soft modeling clay that holds shape when you press your thumb into it but doesn't spring back.
Work surface choice prevents frustration. Wax paper or parchment paper stops sticking without adding texture. Cutting boards work but the clay can grab on smooth surfaces. Some crafters use silicone baking mats. The goal is lifting finished ornaments cleanly without distorting their shape.
Rolling to even thickness takes practice. Most first attempts end up too thick in the middle, thin at the edges. Those wooden dowel guides solve this immediately. 2-3mm thickness prevents cracking during drying while keeping ornaments light enough to hang on tree branches. Thinner than 2mm and you risk breaking during handling. Thicker than 4mm and drying time extends to 3-4 days with increased crack risk.
Cookie cutters punch out shapes cleanly when you press straight down and lift straight up. Twisting or wiggling creates rough edges. The clay piece often sticks inside the cutter - a gentle tap on the back pops it free. Crafters working through a batch typically cut all shapes first, then go back to add hanging holes and decorative details.
Hanging holes need specific placement and size. Too close to the edge and the clay breaks when you thread string through. 3-4mm from the edge gives enough material to prevent tearing. A plastic drinking straw makes perfect 4-5mm holes. Twist the straw slightly as you push through to cut cleanly rather than deform the clay. Some crafters use leather punch tools ($8-12) for precise hole placement.
Surface decoration happens while the clay is still soft. Stamps, textured fabric, leaves, lace - anything pressed into the surface leaves an impression. The folk art aesthetic often combines smooth painted areas with textured sections. Pressing too lightly barely shows. Too hard and you thin the clay unevenly. The right pressure creates 0.5-1mm depth that catches paint differently than smooth areas.
Drying Reality
Air dry clay dries through evaporation. Room temperature and humidity determine timing more than clay brand. In typical indoor conditions (68-72°F, 40-50% humidity), 2-3mm ornaments firm up enough to handle in 24 hours. Complete drying where the clay no longer feels cool to touch takes 48-72 hours. The cooling sensation means moisture remains inside.
Uneven drying causes warping and cracks. Ornaments laid flat on a surface dry faster on top than bottom. Flipping them every 12 hours during the first day equalizes moisture loss. Wire cooling racks allow air circulation on both sides, cutting drying time to 36-48 hours for most pieces.
Cracks appear as the clay shrinks. Thin sections and sharp corners crack first because they dry faster than thick areas. Running a wet finger along cracks while the clay is still partially damp smooths them closed. Once fully dry, cracks stay permanent. Some crafters accept small cracks as part of the handmade aesthetic. Others restart the piece.
Humidity extends drying time significantly. In 60-70% humidity environments, plan on 4-5 days for complete drying. Placing ornaments near (not on) a heating vent or in front of a fan speeds the process without heat damage. Direct sun works but can cause too-fast surface drying that increases crack risk.
Paint Behavior on Dried Clay
Dried air dry clay is porous and absorbs liquid readily. This affects how different paints perform. Acrylics sit on the surface more than soaking in - the first coat often looks blotchy as the clay drinks up binder and leaves pigment. A second coat covers evenly. Craft acrylics work straight from the bottle. Artist acrylics need thinning with 10-20% water or they stay too thick for the small detail work folk art requires.
The clay's absorbency means paint dries fast. You're working on 2-inch ornaments where you need to blend colors or create gradients - that wet working time is maybe 30-60 seconds before the clay pulls moisture out of the paint. Folk art patterns work perfectly here because they're distinct color blocks rather than subtle transitions. Red flower petals. Green leaves. White dots on blue backgrounds. Each element dries before you start the next.
Brush control determines pattern quality. Folk art's characteristic look comes from confident, deliberate brush strokes. Scandinavian rosemaling uses specific curved strokes built up in layers. Mexican Talavera patterns rely on clean lines and geometric precision. Polish folk painting emphasizes symmetry and repeated motifs. The small scale of ornaments means your brush needs to hit exactly where you intend - 2-3mm off and the whole design feels wrong.
Layering colors creates depth. Folk art rarely uses single coats. A base color goes down first - maybe terra cotta or cream for that pottery look. Dried completely. Then pattern colors on top. The base tone shows through anywhere you don't paint, creating automatic contrast. This approach also hides any slight blotchiness from the porous clay.
Detail work separates basic painted clay from actual folk art aesthetic. The characteristic dots, tiny lines, cross-hatching, flower centers - these elements all measure 1-2mm. A size 0 or 00 brush holds enough paint for 3-4 dots before reloading. White dots on colored backgrounds pop visually. Black outlining defines shapes. The repetition of small elements creates visual rhythm that makes folk patterns recognizable.
Mistakes stay permanent once acrylic dries. Unlike canvas or paper where you can scrape or paint over errors, dried acrylic on porous clay soaks in too deeply for clean correction. Most crafters working on their first ornaments discover this about 30 minutes in when they try to fix a wonky line. Starting over becomes faster than trying to repair. After 5-6 ornaments, the muscle memory develops and mistakes decrease.
The Folk Art Design Connection
These painted patterns aren't random decoration - they represent specific cultural traditions that mid-century modern designers intentionally incorporated into American homes. The connection ran deeper than aesthetic borrowing. It represented a philosophical shift in how Americans thought about craft, authenticity, and global culture.
Scandinavian Christmas ornaments became ubiquitous in US homes during the 1950s. Department stores carried Swedish painted wood and Norwegian rosemaling designs. The aesthetic fit perfectly with Danish modern furniture and clean-lined interiors. Those characteristic red and white patterns, the stylized flowers and geometric borders - they showed up on everything from textiles to ceramics. The ornaments sold for $2-5 retail in 1960, equivalent to $20-45 today.
Mexican folk art entered the design consciousness through different channels. Post-WWII tourism to Mexico introduced Americans to Talavera pottery and tin work traditions. The bright colors and bold patterns contrasted sharply with the restraint of Scandinavian design, offering a different approach to handcraft. Alexander Girard's massive folk art collection (now at the Museum of International Folk Art) included hundreds of Mexican painted pieces. He translated those motifs directly into his textile designs for Herman Miller.
Eastern European decorative traditions - Polish paper cuts, Hungarian embroidery patterns, Russian folk painting - arrived through immigration and Cold War cultural exchange. The ornate symmetry and dense pattern work offered yet another aesthetic mode. These traditions emphasized filling space completely rather than the negative space approach in Scandinavian design. Both philosophies influenced how Americans approached handcraft.
The economic reality of mid-century folk art matters for understanding painted clay ornaments today. Handmade folk items sold at craft fairs for $0.75-3.00 in 1960s dollars ($8-25 today). Materials cost maybe $0.15-0.30 per piece. The value came from time and skill - painting intricate patterns took 20-40 minutes per ornament. Modern painted clay ornaments replicate this exact economic structure: low material costs, significant time investment, finished pieces worth $12-25 retail.
What Crafters Discover While Working
Temperature affects clay workability more than expected. Cold clay straight from a basement or garage stays stiff even with kneading. Warm clay from a sunny shelf becomes too soft and sticky. Room temperature clay works best - if yours isn't, adjust your workspace temperature rather than fighting the material.
Hand moisture matters. Dry hands pull moisture from the clay surface, creating micro-cracks that show up after drying. Slightly damp hands keep the clay surface smooth during rolling and cutting. Too wet and you're adding moisture that extends drying time. The balance point feels like hands just dried after washing but not fully dried.
Pattern planning happens before paint touches clay. Folk art's visual impact comes from color relationships and pattern balance. Sketching your design on paper first - even crude thumbnails - prevents the "oh no, this isn't working" moment halfway through painting when you realize the red and green you chose are fighting each other. Looking at reference photos of actual folk pottery and traditional ornaments shows you color combinations that actually work.
Small batches prevent frustration. Rolling out clay for 20 ornaments seems efficient, but you're racing the clock. Clay starts drying as soon as you expose it to air. The first ornament you cut gets decorated while still slightly soft. By ornament 15, the clay has stiffened enough that stamping and hole-punching requires more force and risks cracks. Working in batches of 5-6 ornaments keeps all pieces in that workable state.
Storage between sessions requires attention. Unused clay wrapped in plastic wrap inside a ziplock bag with a damp paper towel stays workable for weeks. Just plastic wrap alone and the clay dries into an unusable brick within 3-4 days. The damp paper towel provides ambient moisture without directly wetting the clay. Too much moisture and you get moldy clay. Too little and it dries out.
Sealing painted ornaments extends their life significantly. Air dry clay remains water-soluble even after drying. Humid environments or direct water contact can soften the material over years. A coat of clear acrylic sealer spray ($8-10) makes ornaments effectively permanent. Two light coats work better than one heavy coat - heavy application shows drip marks and yellows over time. Spray outside or in a well-ventilated area. The fumes are significant.
String threading works better with certain techniques. Jute twine frays when you try to push it through small holes. Wrapping the end with clear tape for the last inch creates a stiff needle-like point that threads easily. Thin ribbon goes through cleanly without modification. Some crafters use embroidery floss for that Scandinavian look. The string choice affects hanging behavior - thick jute holds ornaments at specific angles, thin ribbon lets them spin freely.
Making This Work For Your First Try
Your craft store trip needs a shopping list. One package of DAS air dry clay ($8-10) gives you 15-20 ornaments. A set of 3-4 cookie cutters in shapes you like ($8-12). Small acrylic roller or use your kitchen rolling pin ($0-8). Basic acrylic paint set with red, white, green, black, and maybe blue or yellow ($8-15 for 6-8 colors). Brushes - at minimum one round size 0 or 1 for details, one round size 4 for medium areas, one flat 1/4-inch for backgrounds ($6-10 for a set). Jute twine for hanging ($4-5). Clear acrylic sealer spray ($8-10). Total: $50-75 for everything.
Timeline for completion spans 3-4 days minimum. Day 1: roll, cut, and decorate clay surface (1-2 hours). Day 2-3: drying time (no active work, just waiting). Day 3-4: painting (1-2 hours depending on complexity). Same day or next: sealing spray (15 minutes plus drying time). The waiting is real - you can't rush clay drying without causing problems.
Pattern complexity should match your painting experience. First-time painted ornaments work best with simple geometric patterns. Stripes, polka dots, basic flower shapes with 4-5 petals. These teach you paint behavior on clay without requiring advanced brush control. Once you complete 5-6 simple ornaments, the muscle memory develops for more complex folk art patterns.
Reference materials help immensely. Search "Scandinavian folk art patterns," "Mexican Talavera pottery," or "Polish folk painting" and look at images before you start. The specific motifs - how flowers are structured, where dots go, how stripes relate to shapes - all follow cultural conventions. Copying elements from traditional patterns rather than inventing from scratch results in more authentic-looking folk art.
Workspace setup prevents problems. Clay work is messy despite looking tidy in photos. Wax paper covers your work surface. Paper towels for cleaning brushes and wiping clay residue from tools. Water cup for rinsing brushes. Small dishes or a paint palette for mixing colors if needed. Everything within arm's reach so you're not walking around with wet clay on your hands.
Expect imperfection in first attempts. Clay might crack. Patterns might look wobbly. Colors might not cooperate exactly as planned. This is all part of learning the material. Ornament #1 teaches you problems that ornament #6 avoids. Many crafters hang their first attempt ornaments anyway - the imperfection reads as handmade charm rather than failure. The difference between painted clay ornaments and manufactured decorations is that humans made them, with all the variability that implies.
The folk art traditions these ornaments reference were never about perfection anyway. They were about creating beauty with available materials, using techniques passed through generations, making something decorative that reflected cultural identity. Your painted clay ornaments sit in that same tradition - handmade decorative objects that cost almost nothing in materials, take time and attention to create, and result in something distinctly unlike anything you'd buy at a store.